
Terraform 통한 vSphere 가상머신 배포 방법

1. Terraform이란?
Terraform은 인프라를 안전하고 효율적으로 구축, 변경 및 버전 관리 하는 데 가장 널리 사용되는 IAC (Infrastructure as Code) 도구입니다.
Terraform에서 지원하는 서비스는 아래와 같습니다.
- Azure, Azure AD
- 아마존 웹 서비스
- Cisco ASA / ACI
- 구글 클라우드
- Kubernetes
- OpenStack
- VMware vSphere / NSX-T / vCloud Director / vRA7
- NHN Cloud
제공되는 서비스 목록 전체 → https://www.terraform.io/docs/providers/index.html
2. Terraform 설치
Mac
brew install terraform
Windows
- https://www.terraform.io/downloads.html .zip 파일 다운로드
Linux
wget https://releases.hashicorp.com/terraform/0.14.2/terraform_0.14.2_linux_amd64.zip
unzip terraform_0.14.2_linux_amd64.zip

terraform -v
Terraform v0.14.2
3. Terraform 스크립트 작성
예제) 기존 생성한 CentOS8 템플릿을 배포하는 스크립트 작성
참고 - https://registry.terraform.io/providers/hashicorp/vsphere/latest/docs/data-sources/virtual_machine#firmware
변수를 저장하는 데 사용되는 variables.tf 라는 파일 생성
#===========================#
# VMware vCenter connection #
#===========================#

variable "vsphere-user" {
type = string
description = "vCenter/vSphere 계정"
}

variable "vsphere-password" {
type = string
description = "vCenter/vSphere 패스워드"
}

variable "vsphere-vcenter" {
type = string
description = "vCenter/vSphere 서버 FQDN / IP"
}

variable "vsphere-unverified-ssl" {
type = string
description = "자체 서명 된 인증서를 사용하는 VMware vCenter (true / false)"
}

variable "vsphere-datacenter" {
type = string
description = "VMWare vSphere datacenter 이름"
}

variable "vsphere-cluster" {
type = string
description = "VMWare vSphere cluster 이름"
default = ""
}

variable "vsphere-template-folder" {
type = string
description = "Template folder 이름"
default = "Template"
}

#================================#
# VMware vSphere virtual machine #
#================================#

variable "vm-count" {
type = string
description = "생성 할 VM 갯수"
default     =  1
}

variable "vm-datastore" {
type = string
description = "VMWare vSphere datastore 이름"
}

variable "vm-network" {
type = string
description = "VMWare vSphere Network 이름"
}

variable "vm-cpu" {
type = string
description = "가상머신 CPU 개수"
default = "2"
}

variable "vm-ram" {
type = string
description = "가상머신 Memory 사이즈"
default = "2048"
}

variable "vm-disk" {
type = string
description = "가상머신 Disk 사이즈"
default = "30"
}

variable "vm-name" {
type = string
description = "가상머신 이름"
}

variable "vm-firmware" {
type = string
description = "가상머신 fireware set (efi / bios)"
default = "efi"
}

variable "vm-guest-id" {
type = string
description = "가상머신 OS명"
}

variable "vm-template-name" {
type = string
description = "가상머신을 배포할 템플릿 이름"
}
가상 머신을 만드는 데 사용되는 main.tf 파일 생성
# =================== #
# Deploying VMware VM #
# =================== #

# Connect to VMware vSphere vCenter
provider "vsphere" {
user = var.vsphere-user
password = var.vsphere-password
vsphere_server = var.vsphere-vcenter

# If you have a self-signed cert
allow_unverified_ssl = var.vsphere-unverified-ssl
}

# Define VMware vSphere
data "vsphere_datacenter" "dc" {
name = var.vsphere-datacenter
}

data "vsphere_datastore" "datastore" {
name = var.vm-datastore
datacenter_id = data.vsphere_datacenter.dc.id
}

data "vsphere_compute_cluster" "cluster" {
name = var.vsphere-cluster
datacenter_id = data.vsphere_datacenter.dc.id
}

data "vsphere_network" "network" {
name = var.vm-network
datacenter_id = data.vsphere_datacenter.dc.id
}

data "vsphere_virtual_machine" "template" {
name = "/${var.vsphere-datacenter}/vm/${var.vsphere-template-folder}/${var.vm-template-name}"
datacenter_id = data.vsphere_datacenter.dc.id
}

# Create VMs
resource "vsphere_virtual_machine" "vm" {
count = var.vm-count
name = var.vm-name
firmware = var.vm-firmware
resource_pool_id = data.vsphere_compute_cluster.cluster.resource_pool_id
datastore_id = data.vsphere_datastore.datastore.id
num_cpus = var.vm-cpu
memory = var.vm-ram
guest_id = var.vm-guest-id
network_interface {
  network_id = data.vsphere_network.network.id
}

disk {
  label = "${var.vm-name}-disk"
  size  = var.vm-disk
}

clone {
  template_uuid = data.vsphere_virtual_machine.template.id
  customize {
    timeout = 0

    linux_options {
      host_name = "node-${count.index + 1}"
      domain = ""
    }

    network_interface {}
  }
}
}
자격 증명 및 기타 변수를 저장하는 데 사용되는 terraform.tfvars 파일 생성
서버 IP, 패스워드, 계정을 하드코딩으로 넣게되면 보안 취약하기 때문에 주석처리
# ======================== #
# VMware VMs configuration #
# ======================== #
vm-count = "1"
vm-name = "terraformdev"
vm-template-name = "CentOS8_Default"
vm-cpu = "2"
vm-ram = "4096"
vm-disk = "50"
vm-firmware = "efi"
vm-guest-id = "centos8_64Guest"
# VMware vSphere configuration #
# VMware vCenter IP/FQDN
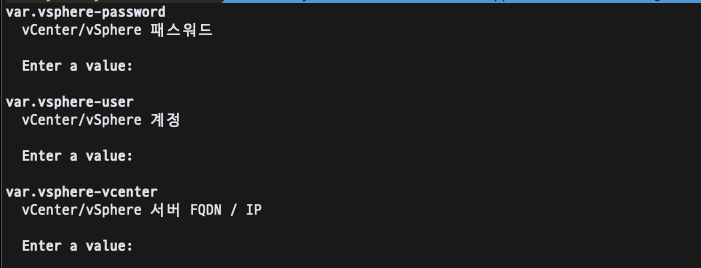
#vsphere-vcenter = ""
# VMware vSphere username used to deploy the infrastructure
#vsphere-user = ""
# VMware vSphere password used to deploy the infrastructure
#vsphere-password = ""
# Skip the verification of the vCenter SSL certificate (true/false)
vsphere-unverified-ssl = "true"
# vSphere datacenter name where the infrastructure will be deployed
vsphere-datacenter = "Datacenter"
# vSphere cluster name where the infrastructure will be deployed
vsphere-cluster = "cluster01"
# vSphere Datastore used to deploy VMs
vm-datastore = "datastore250"
# vSphere Network used to deploy VMs
vm-network = "VM Network"
4. Terraform 스크립트 실행
GitHub 저장소로 스크립트를 push하고 자격 증명 및 환경 설정으로 terraform.tfvars 파일을 업데이트합니다 .
다음 명령으로 Terraform 을 초기화합니다 .
terraform init

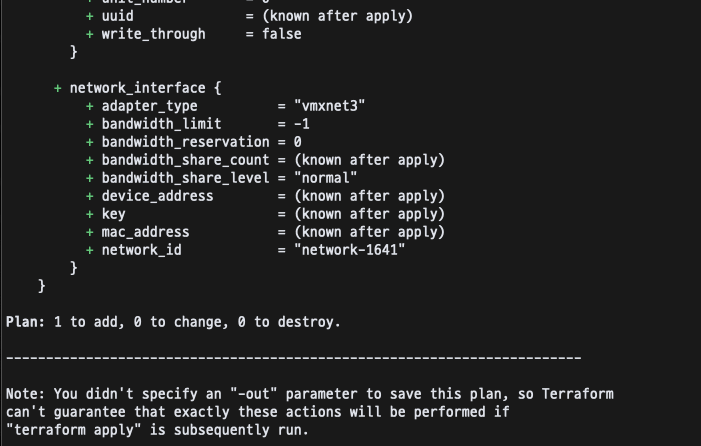
terraform plan
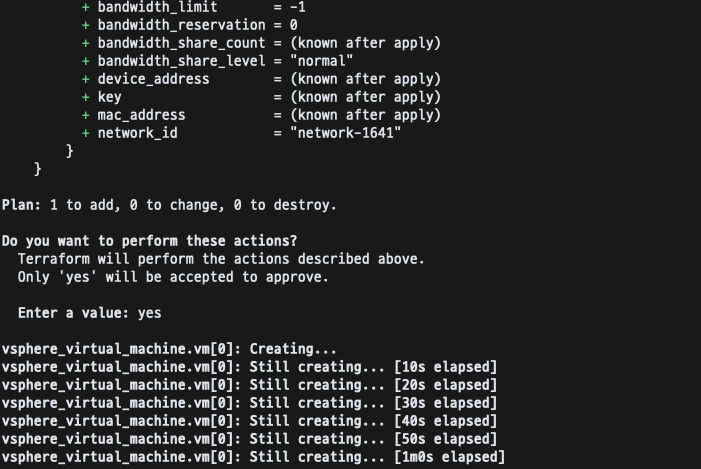
아래 명령으로 Terraform 실행
terraform apply
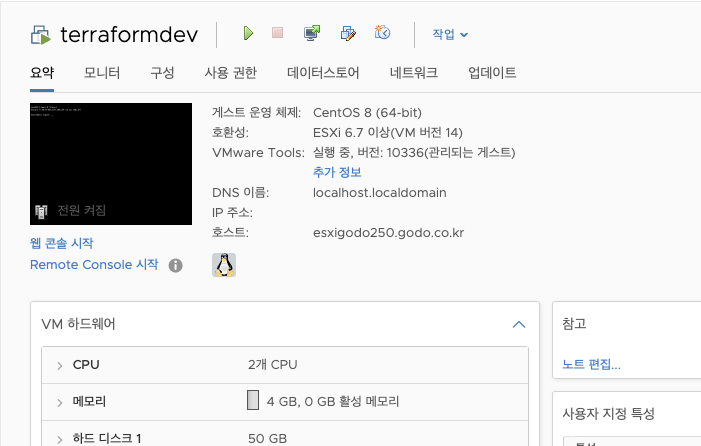
vCenter의 가상 머신
5. 가상 머신 제거
아래 명령어로 모든 가상 머신을 삭제할 수 있습니다.
terraform destroy

댓글남기기